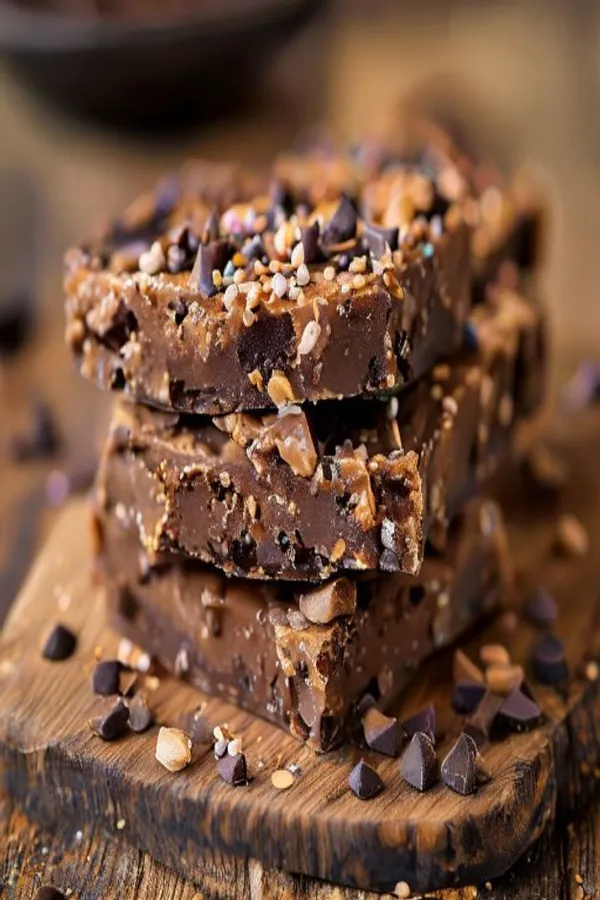
Learn how to make these delicious, chewy, and high-protein no-bake meal prep bars with only five clean, wholesome ingredients in under ten minutes.
Easy 5-Ingredient No-Bake Protein Bars (Perfect for Meal Prep)
In today's fast-paced world, finding healthy, high-protein snacks that actually taste good and do not cost a fortune can feel like an impossible task. Most store-bought protein bars are packed with artificial sweeteners, preservatives, and hard-to-pronounce ingredients. Plus, buying them individually can quickly drain your wallet. That is why learning how to make your own protein snacks at home is a complete game-changer.
These Easy 5-Ingredient No-Bake Protein Bars are the ultimate solution for busy individuals, fitness enthusiasts, and anyone looking for a clean, delicious energy boost. They require absolutely no cooking, take less than 10 minutes of active prep time, and are perfect for your weekly meal prep routine. Whether you need a quick pre-workout bite, an afternoon pick-me-up, or a guilt-free late-night dessert, these chewy, chocolatey peanut butter bars have got you covered.
Why You'll Love This Recipe
Pinterest users are obsessed with quick, visually appealing, and highly nutritious recipes, and this one ticks all the boxes. Here is why this recipe deserves a permanent spot in your weekly kitchen rotation:
- No-Bake Convenience: No need to turn on the oven. Simply mix, press, chill, and slice.
- Five Simple Ingredients: Made with wholesome, pantry-staple ingredients you likely already have.
- High Protein Content: Packed with clean protein to support muscle recovery and keep you full for hours.
- Budget-Friendly: Making a batch of these at home costs a fraction of the price of premium store-bought bars.
- Customizable: Easily adaptable to meet various dietary preferences, including vegan, gluten-free, and dairy-free diets.
The 5 Simple Ingredients You Need
To make these delicious homemade protein bars, you will only need five core ingredients. Each ingredient serves a specific functional and nutritional purpose:
- Rolled Oats: Rolled oats provide a chewy texture and are a fantastic source of complex carbohydrates and dietary fiber, ensuring slow-released, sustained energy throughout the day.
- Natural Peanut Butter: Creamy, natural peanut butter acts as the primary binder while adding healthy fats and a rich, satisfying flavor. You can swap this for almond butter, cashew butter, or sunflower seed butter if you have a nut allergy.
- Protein Powder: This is where the high-protein boost comes from. Use your favorite vanilla or chocolate protein powder (whey or plant-based both work exceptionally well).
- Pure Maple Syrup or Honey: A touch of liquid sweetener helps bind the mixture together and adds a natural, unrefined sweetness.
- Dark Chocolate Chips: Melted over the top or folded into the batter, dark chocolate provides antioxidant properties and makes these bars feel like an indulgent dessert.
Step-by-Step Instructions
Follow these simple steps to create your own batch of delicious, chewy protein bars:
Step 1: Prepare Your Pan
Line an 8x8-inch baking pan with parchment paper, leaving a little overhang on the sides. This will make it incredibly easy to lift the bars out of the pan once they have chilled and set.
Step 2: Combine the Wet and Dry Ingredients
In a large mixing bowl, combine 2 cups of rolled oats, 1/2 cup of your favorite protein powder, and a pinch of sea salt (optional). Stir well. Next, pour in 1/2 cup of creamy natural peanut butter and 1/3 cup of maple syrup or honey. Mix thoroughly until a thick, cohesive dough forms. If the mixture is too dry or crumbly, add a splash of almond milk (one tablespoon at a time) until it holds together.
Step 3: Press into the Pan
Transfer the protein mixture into your prepared baking pan. Use a spatula or the bottom of a clean glass to press the mixture firmly and evenly into the corners of the pan. Pressing it down firmly is key to ensuring the bars do not crumble when sliced.
Step 4: Add the Chocolate Layer
In a microwave-safe bowl, melt 1/2 cup of dark chocolate chips with 1 teaspoon of coconut oil, stirring every 30 seconds until completely smooth. Pour the melted chocolate over the pressed oat mixture and spread it evenly with a spatula. For an extra touch of flavor and aesthetic appeal, sprinkle a pinch of flaky sea salt over the wet chocolate layer.
Step 5: Chill and Slice
Place the pan in the freezer for about 20 to 30 minutes, or until the chocolate layer has completely hardened. Once set, lift the block out of the pan using the parchment paper overhang. Place it on a cutting board and use a sharp knife to slice into 8 to 10 even bars.
Pro Tips for the Best Results
To ensure your homemade protein bars turn out perfectly every single time, keep these professional kitchen tips in mind:
- Choose the Right Protein Powder: Since the protein powder is a primary ingredient, choose one that you actually enjoy the taste of. Plant-based proteins tend to absorb more liquid than whey, so you may need to add a touch more liquid (like milk or water) to get the right consistency.
- Slightly Warm the Nut Butter: If your peanut butter is cold or from the bottom of the jar, microwave it for 15-20 seconds to make it runny and easier to mix into the dry ingredients.
- Use High-Quality Dark Chocolate: Look for chocolate with 70% or higher cacao content for a richer flavor profile and a healthy dose of antioxidants.
How to Store and Keep Them Fresh
These bars are incredibly easy to store, making them an exceptional option for meal prep. Place the sliced bars in an airtight container, separating any stacked layers with small sheets of parchment paper to prevent sticking. They will keep beautifully in the refrigerator for up to two weeks, or in the freezer for up to three months. Enjoying them straight from the fridge or freezer gives them an amazing, chewy fudge-like texture!